The Ultimate Guide to Cannabis Drying Tents
From Harvest to Cure: The Ultimate Guide to Cannabis Drying Tents
Cannabis cultivation has evolved significantly over the years, and one critical aspect of the process is the drying and curing phase. Properly drying and curing your cannabis buds can significantly impact the final product's potency, flavor, and overall quality. Cannabis drying tents have become popular for growers seeking a precise and controlled drying environment.
Investing in a cannabis drying tent can significantly improve the quality of your final product.
As you wish, let's explore the benefits of using a cannabis drying tent, how to set it up, and essential tips for achieving the perfect cure.
Cannabis Drying Tents: The Key to Perfectly Cured Buds
Before we delve into cannabis drying tents, we must grasp the significance of the drying and curing process. Drying is the initial phase after harvesting, where moisture is gradually removed from the buds, making them smokeable and less mold-prone. Curing, on the other hand, is a more extended process that takes place after drying. It involves storing the buds in a controlled environment to improve flavor, aroma, and potency.
Benefits of Using a Cannabis Drying Tent
Controlled Environment:
Drying tents provide a controlled and enclosed environment, enabling growers to manage temperature, humidity, and airflow more effectively.
Space Efficiency:
Drying tents are available in various sizes, making them suitable for small-scale and large-scale growers. They help maximize available space and keep the drying process organized.
Light Blockage:
Light exposure during the drying phase can degrade the quality of cannabis. Drying tents are designed to block out light, protecting your precious buds from harmful rays.
Odor Control:
Cannabis drying tents help contain the distinct and pungent aroma of drying cannabis. This is particularly beneficial for growers who wish to maintain discretion.
Setting Up Your Cannabis Drying Tent
Selecting the Right Tent:
Choose a drying tent appropriate for how much cannabis you plan to dry. Consider factors like available space, the number of plants, and your budget.
Location:
Place the drying tent in a clean, well-ventilated area away from direct sunlight and strong drafts. A room with controlled temperature and humidity levels is ideal.
Hang Lines and Hooks:
Install hanging lines or hooks across the width of the tent. Make sure they can support the weight of wet cannabis buds without breaking.
Thermometer and Hygrometer:
Invest in a reliable thermometer and hygrometer to accurately monitor temperature and humidity levels.
Selecting the Right Cannabis Drying Tent
When choosing a cannabis drying tent, there are several factors to consider:
Size and Capacity: Determine the amount of cannabis you plan to dry at a time. Ensure that the tent's dimensions and hanging space can accommodate your harvest.
Material Quality: Look for drying tents made from durable and light-blocking materials. High-quality materials will protect your buds from light exposure and potential damage.
Ventilation and Airflow: Proper ventilation prevents mold and mildew growth. Choose a tent with ventilation ports or ducting holes that allow you to attach exhaust fans or filters.
Zippers and Seals:
Check for sturdy and secure seals to keep the tent enclosed and light-proof during drying.
Preparing for Harvest
As your cannabis plants near maturity, start preparing for the harvest and drying process:
Flushing:
Two weeks before harvest, begin flushing your plants with plain water to remove any residual nutrients. This improves the flavor and smoothness of the final product.
Dark Period:
Consider implementing a dark period (usually 48 hours) before harvest. This practice is believed to boost trichome production and overall potency.
Testing and Monitoring
Throughout the drying and curing process, be mindful of how your buds are developing:
Bud Snap Test:
A simple way to gauge if your buds are adequately dried is by performing the "bud snap test." When a bud is properly dried, it should snap cleanly when bent, indicating an optimal moisture content.
Curing Progress:
During the curing phase, observe the changes in aroma and flavor. Proper curing will enhance the taste and potency of your cannabis over time.
The Drying Process
Harvest at the Right Time:
Harvest your cannabis plants when the trichomes are at their peak. Trichomes should appear milky white or amber, depending on the desired effect.
Trimming:
Trim excess fan leaves and sugar leaves from the buds to improve airflow during drying.
Hang the Buds Upside Down:
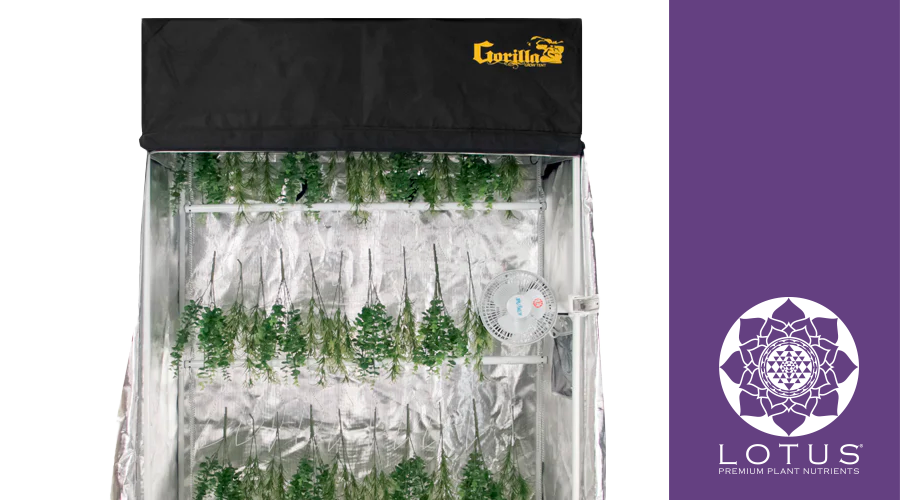
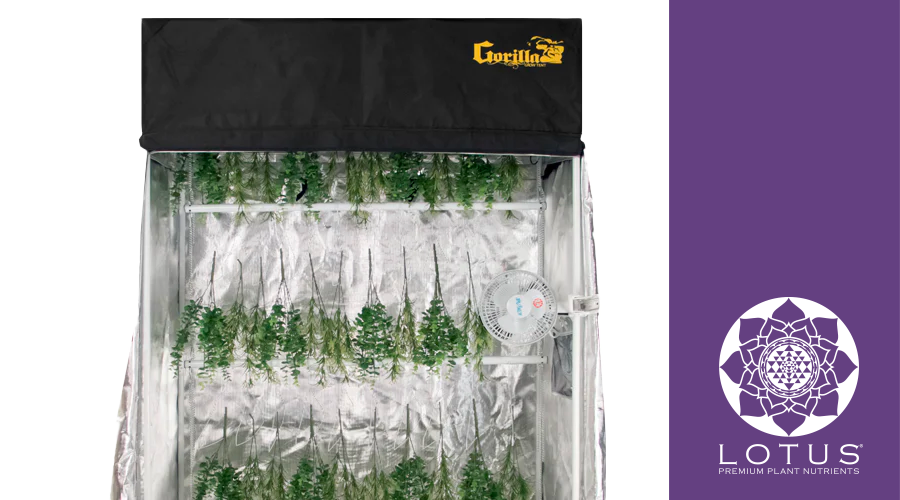
Hang the trimmed buds upside down on the lines or hooks in the drying tent. Ensure there is enough space between each bud for proper airflow.
Maintain Proper Environment:
Keep the temperature around 60-70°F (15-21°C) and humidity at 45-55% during drying. Use the thermometer and hygrometer to monitor and adjust as needed.
The Curing Process
Jar Method:
After the initial drying phase, place the dried buds in glass jars, filling them only about 2/3 full. Seal the jars and store them in a dark, cool place.
Burping the Jars:
Open the jars daily for a few minutes to release excess moisture and prevent mold. Repeat this process for about two weeks.
Common Mistakes to Avoid
Rushing the Drying Process:
Patience is crucial during the drying and curing phases. Avoid the temptation to rush the process, which can lead to harsh-tasting buds with reduced potency.
Overcrowding the Drying Tent:
Proper airflow is essential for even drying. Avoid overcrowding the drying tent with too many buds, which can lead to mold and uneven drying.
Neglecting Environmental Factors:
Monitor the temperature and humidity regularly. Fluctuations in these factors can impact the drying process and result in poor-quality buds.
Ignoring Contamination:
Keep your drying tent and equipment clean and free from contaminants. Regularly sanitize the drying area to prevent the growth of mold or other harmful microorganisms.
Alternative Drying Methods
While cannabis drying tents are an effective solution, some growers prefer alternative methods. Here are a few popular options:
Drying Racks:
Drying racks offer a simple and cost-effective way to dry cannabis buds. They allow for good airflow and can be easily stored when not in use.
Drying Boxes:
Like drying tents, drying boxes provide an enclosed space for drying cannabis. They are often smaller and can be a good option for growers with limited space.
Hanging Lines or Nets:
Some growers prefer to hang their cannabis buds on lines or nets in a well-ventilated area. This method is budget-friendly but may require more space.
Storing Dried Cannabis
Once the curing process is complete, it's essential to store your dried cannabis properly to maintain its quality over time:
Use Airtight Containers:
Transfer your cured buds to airtight glass jars or containers. Make sure they are clean and have a good seal to preserve freshness.
Dark and Cool Environment:
Store the containers in a cool, dark place, away from direct sunlight and heat sources. Proper storage helps prevent degradation and loss of potency.
Avoid Frequent Opening:
While it's tempting to open the jars and admire your harvest, try to limit opening them to prevent unnecessary exposure to air and moisture.
DIY Cannabis Drying Tent
If you're on a budget or enjoy DIY projects, you can create a simple cannabis drying tent using readily available materials:
Materials Needed:
Large cardboard box, reflective Mylar or aluminum foil, duct tape, small fan, and hanging lines/hooks.
Assembly:
Line the inside of the cardboard box with the reflective material, ensuring it covers all surfaces. Cut holes for ventilation and insert the small fan to promote airflow. Hang the drying lines/hooks from the top of the box.
Temperature and Humidity Monitoring:
Place a thermometer and hygrometer inside the tent to accurately monitor temperature and humidity levels.
While a DIY drying tent may not offer all the features of a commercial tent, it can still provide a controlled environment for the drying process.
Best Practices for Consistent Results
Maintain Consistent Environment:
Aim for consistent temperature and humidity levels throughout the drying and curing process to achieve uniform results.
Record Keeping:
Keep a journal of your drying and curing process, including environmental conditions and any adjustments made. This will help you refine your technique for future harvests.
Happy drying and curing, and may your cannabis journey be filled with success and delightful harvests!

