News

Growing Weed Stages: Your Complete Cannabis Gro...
Understanding the distinct growing weed stages is essential for successful cannabis cultivation. Each phase of development requires specific environmental conditions, nutrition, and care techniques that directly impact your final yield...
Growing Weed Stages: Your Complete Cannabis Gro...
Understanding the distinct growing weed stages is essential for successful cannabis cultivation. Each phase of development requires specific environmental conditions, nutrition, and care techniques that directly impact your final yield...

How to Grow a Weed Plant from Scratch: Your Com...
Growing a weed plant from scratch might seem intimidating, but with the right knowledge and equipment, anyone can cultivate premium cannabis at home. Whether you're completely new to gardening or...
How to Grow a Weed Plant from Scratch: Your Com...
Growing a weed plant from scratch might seem intimidating, but with the right knowledge and equipment, anyone can cultivate premium cannabis at home. Whether you're completely new to gardening or...

Best Grow Tent for Beginners: Your Complete 202...
Choosing the best grow tent for beginners can feel overwhelming with countless options flooding the market. Whether you're starting your first indoor garden or transitioning from outdoor growing, the right...
Best Grow Tent for Beginners: Your Complete 202...
Choosing the best grow tent for beginners can feel overwhelming with countless options flooding the market. Whether you're starting your first indoor garden or transitioning from outdoor growing, the right...
Growing Weed in Grow Tent: Your Complete 2025 G...
Growing weed in a grow tent has become the gold standard for indoor cannabis cultivation. Whether you're a complete beginner or looking to upgrade your current setup, grow tents offer...
Growing Weed in Grow Tent: Your Complete 2025 G...
Growing weed in a grow tent has become the gold standard for indoor cannabis cultivation. Whether you're a complete beginner or looking to upgrade your current setup, grow tents offer...

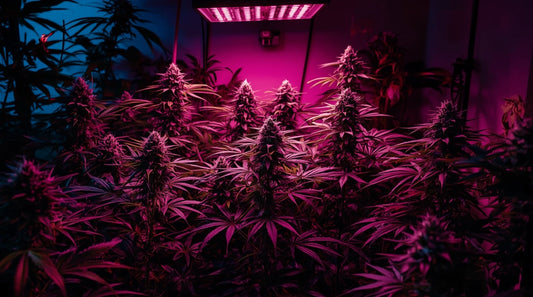
Best Weed Grow Lights 2025: Your Complete Guide...
Growing premium cannabis indoors requires one critical component above all others: the right grow lights. Whether you're a first-time grower or an experienced cultivator, choosing the best weed grow lights...
Best Weed Grow Lights 2025: Your Complete Guide...
Growing premium cannabis indoors requires one critical component above all others: the right grow lights. Whether you're a first-time grower or an experienced cultivator, choosing the best weed grow lights...

How Long Does It Take to Grow a Weed Plant: Com...
Cannabis Plant Development Overview Understanding how long it takes to grow a single cannabis plant requires examining the complete lifecycle from germination through harvest. Individual plant development depends on genetics,...
How Long Does It Take to Grow a Weed Plant: Com...
Cannabis Plant Development Overview Understanding how long it takes to grow a single cannabis plant requires examining the complete lifecycle from germination through harvest. Individual plant development depends on genetics,...